Troubleshooting Inkle Band Weaves

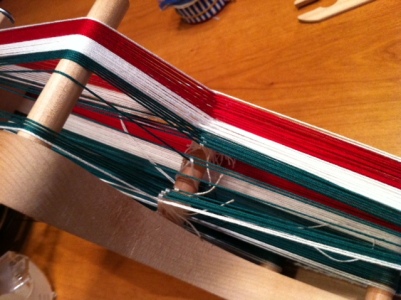
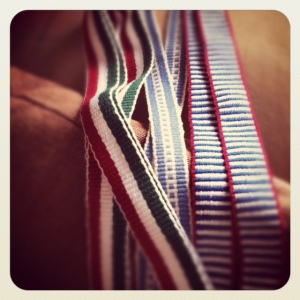
Every now and then I get the urge to make a small inkle band using my Ashford Inklette loom:

This loom is pretty affordable and great to do some small weavings when you want to have something you can take with you easily.  I wanted to weave something at this year’s MSKR (Men’s Spring Knitting Retreat) 2012, and though I could have taken my rigid heddle loom, I went for ultra, ultra portable.

What I am ultimately making these bands for – beats me. I just make them.

It’s funny how I wove two or three trouble free bands and then all of the sudden, errors kept coming up all on the same project.

First, if I leave an inkle band in mid warp, I tie the active yarn several times around the bottom peg to maintain the tension until I continue. Well I had done that but when I returned, I continued warping without realizing I still had the wraps around the peg. I finished warping and then realized those loops were still there, preventing me from sliding the band around.

My solution was to carefully, slip the warp threads ahead of the problem off and hold them under tension while I took off all of those wraps. I then, again carefully, placed back all of the warp threads in my hand.

Great, except now one of my warp threads was super loose. I decided the best fix for this was to cut that loop and tie it to the adjacent warp thread very tightly. Even after doing so, I still found it too lose so I resorted to the next best logical solution…

…scotch tape.

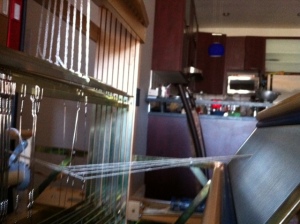
Then I was weaving happily along when a middle heddle flew off! I guess it wasnt tied all that well. Here I separated the warp as much as I could, loosened the tension, and tried to slip a new yarn in just the right position and tie the new heddle down. Here it is in mid repeair:

I can just say that the space I had to work in wasn’t very generous, but I did manage it somehow. Its still not tight but hopefully I can continue to the end with no further issues.

The lesson is, even when things go wrong, at least you get the opportunity to try learning how to fix them and know what to look out for the next time around. It’s the only way to become really good at your craft.

Table loom weaving gets high tech – custom software

In my earlier post, I wrote about a liftplan and how it helped me save time when it came to working the levers of my table loom.

So I finally had my next project set up, and I  happily had a printout of my lift plan next to me, along with a nifty ruler so I wouldn’t lose my place.

After only minutes of weaving, I was struggling – I was losing my place often, and I would squint at the printout, not sure what line the ruler was on. Actually the ruler bothered me quite a bit. When I set my shuttle down, I had to use both hands to adjust it properly to the next line. Often I had wondered if I had woven the line the ruler was on or if I should have moved it forward.

An answer came to me in a heartbeat. The execution would be another story.

During my spare time, I craft a lot. Before the interest in the textile crafts, I was creating images in my darkroom, or playing instruments. But my day job – and what I studied, was computer engineering.

It may sound like crafting and engineering are not alike at all but in some ways they are. Learning to program as a career provided a (in my mind at the time) an easily sustainable way to create things.

What I was making was virtual and just a long series of 1’s and 0’s but I was applying specialized knowledge to create software from my own design. Just like a weaver weaves so that they can make their own unique cloth, I could make a program that reacted and looked exactly the way I wanted it to.

And that’s what I turned to to solve my weaving problem.

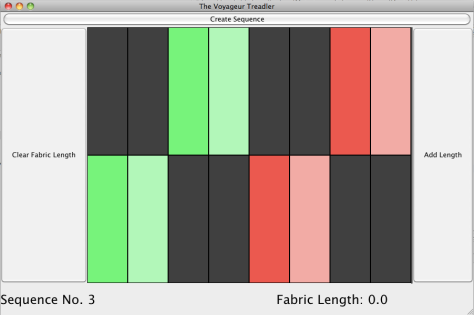
It took some time to get it going. Programming is an involving effort, much like many other crafts. The above is the main screen of what I wrote.

I thought it would be great if a program could just feed me, one at a time, what levers I had to depress. I didn’t have to deal with flipping a liftplan or wondering what row I was on – the computer screen would always tell me – I just had to worry about advancing the pattern.

I can go backwards, and I can note which line of the treadling I’m on in the bottom left corner of the seqeuence if I want to return and don’t know where I left off.

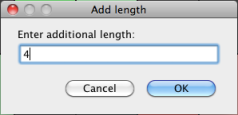
Later on I entered a system to keep track of how much fabric I have wovem. Once I measure off a recently completed woven section, I hit spacebar and i get the following dialog:

Then the number I input is added to the bottom right corner of the screen.

And entering the pattern couldn’t be any more easier. This is the Pattern Input Dialog:

All I do is draw the tie-up with the mouse and write down my treadling sequence. Voila! The program basically calculates its own lift plan and shows the sequences to me one at a time.

And since I can make the program look any way I want, I chose to depict the levers in positions that would correspond with my voyageur loom. I also colored the levers to close approximations of what the levers look like on my actual loom. It’s surprisingly easy to look at the screen and set up the levers properly.

With this system, I believe I have set up my table loom weaving to be as fast as it possibly can. I still have to set the shuttle down. I still have to flip the levers. I also have to advance the sequence on the software. But I have freed my hands any way to flip the levers – so that last point is not so much an issue. If only I can get my hands on a usb foot pedal.. 😉

It would also be nice to implement some sort of save feature!…one rainy day…

The Liftplan

Not too long after I had gotten my brand new loom, I realized I was instantly drawn to complex 8-shaft patterns.

The first draft I bought (and used for my first multishaft project!) was an advancing twill design on all 8 shafts.

If anyone is not familiar with advancing twills, some have long or not easily identifiable repeats when you are threading your warp yarns (which was the case for my pattern). Its the same story for the treadling – like a complex knitting chart, you need to work very slowly and pay attention.

This immediately created a problem for me. My table loom has no treadles. Not only do I have no identifiable pattern, for each treadle I have to set the 8 levers exactly. The  headache that was going in my mind wondering how I I would keep my sanity while trying to make sure I made no mistakes made me wonder if this was the right loom. Should I have gotten a floor loom with treadles?

 I started brainstorming immediately to find ways to simplify this process. My first solution is the subject of this post. My even better refinement will be the subject of another one.
My first thought was – since I don’t have treadles – I don’t really see the point in referring to that part of a weaving draft. I devised a sort of Numbers template (a mac equivalent to Excel) where I could convert one row of a weaving draft into the sequence of levers I had to depress:
This is better to visualize then explain. Below is the draft that I posted in a previous post:
 
And this is what I converted it to in Numbers:
In the original draft, the first step is to lift the 8th treadle, and you can see in the tie-up that it lifts shafts 1,3,4 and 7 – so in the spreadsheet, I fill out those numbers. (The numbers go from right to left because that is the way the levers are arranged on my table loom).
Then I write out the rest of the treadles until it repeats.
And that’s pretty much it! I print out the chart, keep it by my loom and follow it, pressing the levers indicated in each row.
Being a new weaver, what I actually had created, unbeknownst to me, was a liftplan.
A weaving lift plan shows the same information as a typical weaving draft, with a couple of key differences. The tie up section is empty. The treadling section no longer represents the the treadles that have to be pressed – they now show which shafts have to be raised on each row.
After inputting the draft above into Fiberworks, I had it converted into a liftplan. Now the draft looks like the following:
This is exactly what I was doing in my spreadsheet diagram. (Leclerc Voyageur table loom users beware – shaft 1 on a liftplan is the leftmost shaft, but the lever that controls it on the loom is the rightmost! You may need to invert a lift plan.)
At the end of the day, since the software can easily convert a regular weaving draft to a lift plan, I could cut time in my preparation by simply using what the software was giving me, rather than spend time in a spreadheet creating my own charts:
I thought this would solve my table loom woes, but there was something even better…

Project: Voyager Scarf

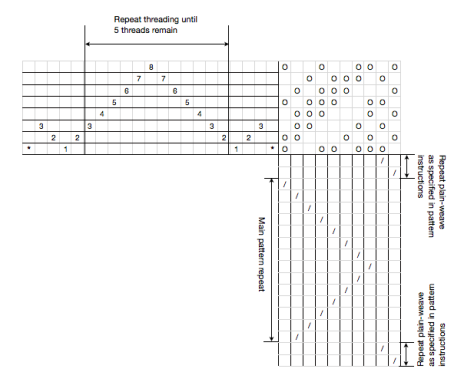
So named in honor of my trip to Plessisville to pick up my new 8S Voyageur table loom, I made this scarf out some Orlec I picked up on the same trip. Orlec is 100% acrylic, and though I generally hate using it in most fiber projects, I didn’t mind it so much here. The result does not look bad at all and I wanted to practice a new draft and my own design without using any fancy weaving yarn. I think this would be great to redo sometime with natural fibers. The draft is something I came up with on my own:

  • Equipment
    8-shaft loom that has a weaving width of 10″ or greater; 12-dent reed; shuttle; bobbins; warp sticks or suitable roll of paper for winding the warp.
  • Yarns
    Warp and weft: 8/2 Orlec 100% acrylic (3360 yd/lb) in Rust (450 yards) and Gold (650 yards)
  • Warp Length
    217 ends (that count is including 2 floating selvedges), each 3 yards long. (this accounts for about 7″ of take-up, a 5″ fringe on each side and 24″ of loom waste) Note: Its probably a generous warp I am giving here: I had left-over, and I’m trying to recall after the fact how much of it I measured, so you could get away with less but 3 yards should surely do it)
  • Sett
    Warp: 24 epi (2/dent in a 12-dent reed)
    Weft: ~22-24 ppi
  • Dimensions
    Width in reed: 9″
    Woven length (under tension):  about 80″ (approximation). This is not counting the fringe, which is of course not woven.
    Finished size after washing: 82″ including fringes (5″ long each), 8″ wide
 
  1. Wind the warp with the two floating selvedges in the following color order: 3 ends in rust, 211 ends  in gold, 3 ends in rust. Secure the warp and remove from warping board, forming a chain.
  2. Sley the reed putting 2 ends in each dent, centering for a weaving width of 9″. I left the floating selvedges in their own dents.
  3. Finish dressing the loom using the provided draft.
  4. After spacing the warp, weave 5 to 6 picks in plain-weave using Rust by alternating between treadles 9 and 10. Change to Gold and weave 2 more picks of plainweave.
  5. Changing back to Rust, weave following the treadling sequence until the woven cloth measures around 80″.
  6. Change to Gold and weave 2 picks of plain-weave. Change to Rust and weave 5 to 6 more picks in plainweave.
  7. Remove from loom. I used a braided fringe, braiding two sets of 4 ends in one direction, twisting both braids together in the opposite direction, and then securing the braid in a knot.
  8. Wash in hot water, let dry, and trim all woven in ends.

Lottery find at Indigo books – Doubleweave!

A couple of weeks before I acquired my table loom, I was on my way to a movie with a friend, when I passed by Indigo books in Montreal.

Indigo Books and Music Store at Yorkdale

(Okay this is not the Indigo store in Montreal, but I am allowed to use this image! 🙂

Weaving was very much on my mind during my walk, as I was dreaming about what I would weave with my new loom, so I popped in the store to humorously see what weaving books were in stock.

I say humourously because there are never any weaving books in stock. I ocassionally see some in American bookstores, but the market here for such things is pathetically small, so I was expecting to find nothing and idle the rest of my time away in the magazine section.

But, unbelievelingly enough, this is what I found in the crafts section:

Jennifer Moore’s book on Doubleweave by Interweave Press! This was no beginning weaving book – it was a specialized weaving technique that really doesn’t belong in a mainstream Canadian bookstore 🙂

I couldn’t believe my eyes. I pulled it out of the rack and ran to my friend to tell her what I found. My non-weaver friend just had a blank stare on her face, thinking I had gone totally mad.

And I had. That book came home with me that night and I skimmed through every section before going to bed.

Double weave allows you, among other things, to weave a folded fabric that is, once off the loom and unfolded, wider than the loom can physically handle. Which, if you have a narrow loom, opens a new world of possibilities – my table loom would suddenly be capable of making shawls or pillow coverings!

There is one main catch when making a wider fabric: You need to divide your loom’s harnesses in two in order to manipulate the upper and lower layers as you weave. This means that a four-harness loom can only weave a 2 harness pattern (plainweave) in doubleweave, and if I want to design a doubleweave cloth on my 8-harness table loom, I’ll be limited to 4-shaft patterns.

You can also create a tube of fabric (great for bags or purses), or make patterns that appear in reverse on the other side of the cloth. (Double weave pickup allows you to make any design you want, free of restrictions). You can also connect the two layers of fabric to make an extra thick and cushy cloth. The layers on one side can be exchanged with the other at any time, for a variety of effects.

I am looking forward to giving this technique a try sometime soon!

(and yes, anyone who knows me knows that the geek in me would totally make a QR code doubleweave scarf as shown below 🙂

QR3D doublewoven http://www.textilecentermn.org/

QR3D doublewoven http://www.textilecentermn.org/ (Photo credit: RuTemple)

The Weaving Draft

It doesn’t take long when learning to weave until you encounter your first drafts, and it took me a while to figure out what they were and how they worked. I thought I’d write about how I learned to understand a weaving draft.

A draft can be considered to be the equivalent of a knitting pattern. Actually, not really. It’s more like a chart in a knitting pattern. Its not enough information for a weaver to start a particular project – details such as sett, yardage, material, finished project dimensions are all absent , but it provides information on how to set the loom up and work it to produce a cloth with a particular interlacement.

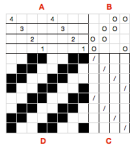
Drafts are usually divided into four quadrants. In the draft below of a 2/2 twill, I’ve labelled the quadrants A to D.

The Threading (A)

This section shows how the harnesses/shafts of a loom must be threaded. (Editor’s note: I used the term shafts and harnesses interchangeably without realizing and didn’t have time to fix it.) A harnesses job is to raise the threads that are assigned to it so that the weft yarn can pass underneath them. This section tells the weaver what threads each harness lifts and in what order.

The horizontal lines represent each individual harness. The bottom line is the harness closest to you if you’re sitting in front of the loom. You can also tell how many shafts your loom has to have to weave the draft by looking at how many rows are in this section.

Though there are many ways to thread the loom, two common ways to thread is straight threading and point threading.

In straight threading, a warp yarn goes through harness 1, the next yarn goes to harness 2 and so on. After you thread a heddle on the last harness, you go back to harness 1 and continue.

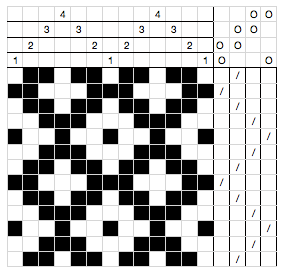
In point threading, you also thread harnesses 1 at a time. When you reach the end however, you change direction and thread the harnesses in the reverse order instead of starting back at harness 1. The original draft is shown below, with the only thing changed is the threading from straight to point threading. The diagonal stripes become horizontal zig zags.

The Tie Up (B)

Treadles (the floor pedals of a loom) are used to raise 1 or more shafts at the same time. The treadles on most loomes are usually fully configurable and can be set up to raise any combination of shafts you want it to. By doing so, the treadles provide the weaver a way to quickly raise combinations of shafts that form a pattern without having to think in terms of indiviaual harnesses (which is the case for my table loom). This section tells the weaver how to connect the treadles to the shafts.

Each column in quadrant B represents a treadle. Column 1 is for the first treadle and so on. If a row of that column is marked with a figure (usually an ‘O’ or its filled in), it means that the treadle needs to be connected to the shaft it is next to.

The Treadling (C)

This section simply tells you what order to press the pedals in to form a particular pattern the cloth. Like the threading, common treadlings are straight and point treadlings – they operate in the same way.

In the example of our 2/2 twill above, if we change the treadling from straight to point, we now get diamond patterns:

You can probably notice by now that by using a point pattern on the threading, treadling, or both, introduces a lines of horizontal and vertical symmetry into the cloth. You can also see in drafts such as this that the pattern in the cloth can be seen in the the tie-up quadrant of the draft.

A final note about our example, you’ll notice that in this draft, the threading and the treadling order is exactly the same. You’ll see the instruction “tromp as writ” come up from time to time, sometimes in drafts where the treadling is absent. This means to simply treadle in the same order as is threaded, I imagine its an old way of saying “treadle as written”.

The Drawdown (D)

This section gives you an idea what the finished cloth pattern will look like – it basically shows you the resulting interesction of the warp and weft yarns, usually with the implicit assumption that the warp is a black yarn and the weft is a white yarn.

Sometimes, more than one repeat is shown in either direction so you can see how one repeat connects with one another when they are laid side by side.

In the diagram below, you can see how you can figure out how to draw this section if you know what’s in the other three. I show how the second pick (weft row) is drawn in our 2/2 point twill draft:

  1. First you look at the tie up associated with the treadle that is being pressed and determine which shafts are being raised.
  2. Next you look across the shafts and every column that is filled with a number represents the threads that that are being lifted
  3. Finally, in the current pick that is being drawn, you darken each square that is directly below the squares being lifted.Continue the process for each pick and you’re done.
One last note before signing off – what you’re seeing in quadrant D is a drawdown, the  key word being down. When we weave however, the cloth is actually formed in the other direction (from bottom to top). For that reason, sometimes you’ll see drafts with quadrants A and B at the bottom, which will show how the actual cloth will look as it is woven on the loom. For fully symmetrical patterns, the direction doesn’t matter. But for other drafts, such as our simple 2/2 twill at the beginning of the post, this will mean that what looks like a twill that travels in the right direction in the draft will actually travel in the left direction when it is woven!

I randomly designed something! / Postal surprise

Before I acquired my table loom, I started studying / trying to figure out how to intentionally design drafts (as opposed to randomly filling things out and seeing what happens!).

Apart from trying to figure some stuff out, I found an excellent series of articles in some old Shuttle Spindle and & Dyepot magazines given to me by my friend Phil.

But before I could comprehend any of it, the software engineer in me led me straight to weaving software. The first one I got was actually a lead from my friend Aaron, who showed me an app for the ipad and iPhone called iWeaveIt back when I just had my rigid heddle. It is based on the WeaveIt weaving software package (which I can’t own since I don’t have any windows PCs)

It’s basic and cheap but it does excel at quickly doodling / visualizing drafts on the go.

I also have been evaluating Proweave and Fiberworks. They’re both great but I have a smaller tilt towards Fiberworks. And they both run on Macs. A look at what weaving software can do would actually make a great post in of itself.

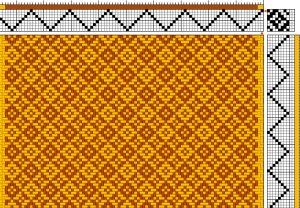
I came up with this draft in Fiberworks, All I did was select a point twill threading (and treadled in the same fashion), and tried to draw some pattern in the bottom left quadrant of my tie-up. Fiberworks then flipped, rotated and inverted that small drawing based on my parameters to fill the rest of the tie-up … and voila!

 I’m sure it’s in a pattern book somewhere. I picked some colors for warp and weft that it might look good in, and from all the initial random doodlings that I did where I had no idea what I was doing, I like this one the most. I would love to try weaving it some day. If everything I said sounds like greek I might just explain drafts at some point too.

————————————-

After I wrote the first draft of this blog a surprise came in the mail from Webs. (ok not really much of a surprise):

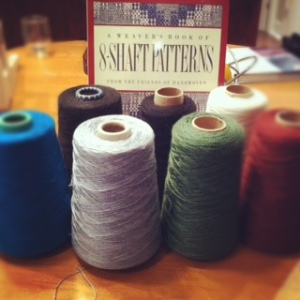
  Lots of great inspiration in my new library addition, and some tencel, merino, and alpaca/silk weaving yarns for future projects.

Looking at the colors, I think forest green and black would also make a nice color combination for my draft above. I just might try to make a scarf out of it.

Calculating warp and weft

I have a couple of friends who may soon be trying weaving out for the first time. The first thing they need to do is plan out their project, which may seem daunting with all the formulae and math involved, but its really all not that bad if you break the steps down bit by bit.

So I thought I’d walk my friends through an example of how I personally calculate the various parameters of my weaving project, with an example so you can see the math in action. There is some emphasis on rigid heddle looms, since that sometimes the loom people start with, but most of it applies to other looms as well.

  1. Decide on a desired width and length of your project: Your width is contrained by the size of your loom, the length less so. There is a point (that I haven’t reached), where you wind on so much cloth on the front beam that you can’t really weave any more. This will happen quicker if you’re making thick cloth. (bulky yarns, doubleweave). For the length, include desired fringes.
    Our example: I want a scarf that will be 8″ wide. The scarf itself should be 55″ long, with a 5″ fringe on each end.
    width: 8″
    length: 55″ + 5″ + 5″ = 65″
  2. Calculate the actual width to warp accounting for draw in: Yarns in a woven project actually go over and under themselves many times, and this interlacing takes up yarn all on its own – the yarn does not go straight across from one side to another. For this reason, if you measure out exactly the length and width you need and dress your loom for those measurements, you’ll find that the project is narrower and shorter when its taken off the loom. This is known as draw in. I think the actual amount a piece draws in varies based on the material used, but I usually factor 10% in each direction.
    Our example: Our desired width is 8″. if we add on another 10%, we have the following:
    width accounting for draw in: 9″ (8.8 actually but I just chose to round up for convenience, you don’t have to)
  3. Determine sett (epi): Now we want to figure out how closely we want to put our warp yarns next to each other in the final piece. sett, or epi (ends per inch) is exactly that – the number of warp ends (yarns) in one inch of fabric. The following calculation will give you an ideal sett for plain weave – what you usually weave on rigid heddle looms – but there’s no sett (pun!) rule: If you want a drapier fabric, you can put less warp ends in an inch, if you want a firm fabric, you’d put more ends per inch.I take my intended yarn, and determine the wraps per inch using a wpi tool or ruler. I put wrap the yarns around the tool or ruler nice and snugly, the way I’d expect them to lie against each other in the finished piece, and measure how many wraps in one inch. I divide that # by 2 to get the sett.
    Our example: I choose some random yarn from my stash that will look nice. I find that I have about 19 wraps per inch. Since that doesn’t divide evenly by two, I can just say the following:
    sett: 9-10 epiIf you’re not weaving plain weave, you would need to adjust the above number. Different weave structures require different setts for a similarly dense fabric.
  4. If you’re rigid heddling, Choose a rigid heddle!  Heddles commonly come in 5,8,10,or 12 dent sizes. A dent size is related to epi. An 8 dent heddle means 8 threads can be threaded every inch. If you’re somewhere between two numbers, you can decide now if you want a looser or denser fabric.
    Our example : I can choose an 8 or 10 dent heddle. I want a dense fabric
    10 dent heddle chosen
  5.  Determine number of warp ends needed: So we know how many warp yarns are in 1″, and we know the width that we want to warp, so this part is simple:
    Our example: 10 epi x 9″ = 90 warp endsNow you know how many times you need to go around the warping board, or if you’re direct warping, you now know you need to go through 90 slots and holes, or 45 slots and 45 holes.
  6.  We now want to find out how many yards of warp yarn you will need. We will start by figuring out how long 1 warp yarn should be. Start with your intended length and account for draw in, just like we did for the width:
    Our example: 65″ length (with fringes) * 1.10 = 72″ inchesNB: Some material shrinks after being finished/washed. After you know how much this might be, you might want to tack on additional %s for your warp and weft to account for shrinkage when finishing your piece.
  7. Add loom waste: Some of your yarn will always be unweavable. You use up some yarn to tie the warp to the front and back aprons. (On my rigid heddle loom, I can minimize the yarn at the back apron rod by not cutting one end of the warp putting the loops directly on the apron rod). In addition, it will be harder to form a clear shed as the back apron rod gets closer and closer to the heddles. The yarn that remains from the woven piece that goes through the heddles and to the rod at the end of the weaving is also waste. This varies from loom to loom. Usually, the bigger the loom, the larger the waste. Rigid heddle looms have little waste. I have been putting 24″ in my calculations. That’s probably more than necessary – I think my table loom is closer to 24″ of waste than my rigid heddle – but you can adjust after you’ve done some projects and get a feel for your amount.
    Our example: 72″ + 24″ (loom waste) = 96″
  8. Add sampling space: if you want to try a new pattern, or practice some techniques at the beginning, you can add some here so that you can do so at the beginning. 6″ can be enough if you’re just trying out the pattern to figure out how much to beat and if you like it / want to adjust it. If I’m doing plainweave or I have already done the same kind of weave, I leave it out
    Our example: 96″ + 6″ (sampling) = 102″8b. If weaving multiple pieces, you may want to add some inches between each piece if you want to actually seperate them while weaving (you may simply want to cut the cloth and sew hems though)
  9.  We have arrived at our next important piece of info:
    Our example: 102″ (or 2.83 yards) is the length of our warp. How many yards do we need? Multiply by the # of warp ends:Our example: 2.83 yards in one warp end  times 90 warp ends = 254.7 yards of warp total
  10.  Almost there! We need to calculate our weft. I am going to assume we’re aiming for a balanced plain weave(Balanced plain weave is simply a fabric that has the same number of warp ends per inch as it does weft ends per inch). If your goal is weave a balanced plain weave, then you can just use the same amount for your weft yarn:
    Our example: 254.7 yards of weft total.
    Total: 500 yards needed for entire project. You can add 10% if you want to make sure you have a comfortable amount: buy 550 yards of material.When you have more weft ends per inch (or less) than the warp, you need to make a similar calculation as you did for the warp. Calculate how many weft threads you’ll have per inch, how long one weft thread is (more than the width of the piece because of draw in), and multiply by the entire width of the project.
And that’s pretty much it! You now have: yardage needed, # of ends to warp, and the length of your warp. You are ready to start winding!
You can design your own calculating spreadsheet based on the above steps. There may be plenty out there but if you make your own, you can walk through the steps and organize your sheet any way you like. I use Numbers for the Mac. It allows you to put several spreadsheets of various sizes on one blank canvas.
A final note, do something which I always forget to do: In a notebook, write the length of the warp you calculated and the width you will be warping on. When its off the loom, measure and record those widths. Once you’ve washed the piece, measure again and record.
If you do this consistantly, you can start to adjust your weft and warp draw in, and you’ll know how much washing will affect the dimensions.

Loom Day – Into the deep end

April 05th was recently deemed Loom Day – When I learned that Leclerc Voyageurs were fairly easy to get in Plessisville Quebec, and that picking it up in person would net you a discount, then how could I not resist?

I enlisted the aid, moral support of my good friend and road trip buddy Anik, and we left a bit before noon on a nippy Thursday morning.

We were on away to M.Brassard and Fils, who, apart from selling Leclerc looms, have an impressive selection of weaving yarn and accessories (not to mention friendly and helpful staff)

Here is where I would have inserted a picture of the building if it were not for my excitement in getting in and totally forgetting to do so. Shucks. There’s always the next loom purchase…

We walked in, perused, gawked, then I went to work collecting accesories for my loom: Etra heddles, shuttles, bobbins, warping sticks, a dorothy table, and of course some yarn.

We drove back and I had this very funny notion that I would stay up and weave a small sampler…

And then it dawned on me that I had 500 heddles to install. So on its side the loom went and it was off to work.

    There I was inserting each metal heddle one by one when it dawned on me that they were threaded in such a way that should in theory allow for easy transfer from the pack they came in to the heddle bars.

But it took a couple of more frames of heddle inserting to come up with the most efficient way of transfering the heddles.

By now it was 2 am and I had a couple of more shafts left.

Here is an image of the almost completed job. I am using a laptop to weigh down the bars so they don’t move:

I put back all the fames, tying them to the levels and…I couldn’t remember at what height they were factory installed at.

I normally would stay calm but at this point I was sleep deprived. I had to fix this.

I tied some strings from front to back beam, and moved the heights of the shafts like crazy. I tried to make the strings parallel and horizontal, I tried to make the upsheds even. But nothing I did would help.

I took a picture of the cross section and went to bed at 3am, or perhaps I passed out on the floor, I can’t remember which.

The next morning I posted it on Ravelry and get excellent feedback:

  The plan was to dress the loom fully with a small project and once everything was in place, I would play with the shaft height of each frame. The goal was to get the threads in the neutral position to stay as far down on the beater as possible, and when the frame was up, make sure all of the threads formed a nice, even shed.

I chose some crochet cotton, measured an arbitrary length of warp, and arbitrary # of ends, chose a set that I thought would be appropriate for patterns based on 2/2 twill, and went to work.

All I can say – it was not easy. I knew the motions, but I struggled to find comfortable positions, and making sure every end stayed nice, even and untangled.

Around midday, the loom was finished and ready warp was spaced out.

Meet my new voyageur loom, dressed (I wouldn’t show her naked…anymore…maybe) and in her temporary spot:

It was time to explore some multishaft patterns (with a straight threading)

I started with a 4-shaft 2/2 twill, in one direction first, then reversing directions.

I then moved to all 8-shafts, trying a draft I designed and then random ones found on handweaving.net

I was a couple of inches in when I spotted two heddle threading errors, and some sort of mistake on the far right.

My selvedge threads look a bit loose. I don’t know if I’m putting enough tension or its because they’re simply wrapped around the warp beam and not weighing them down any further.

But its a sampler. It’s my first multi-harness weaving. And I am smitten. I can’t wait to take the sample off the loom!

Warp length: who knows
No of ends: who cares
Yarn: #10 crochet cotton, probably found at a discount bin at Michaels

sett: 18 epi (I think its a tad loose)
warp threading: straight
draft: anything I want to try 🙂

Introductions

Hi, my name is David and I’m a budding weaver.

I must admit that my attempts at blogging usually fails – a busy schedule usually does very well to hamper regular updates.

I actually have had interests in all of the textile crafts over the years, but my interest in weaving in particular has recently shot through the roof and I have contemplated starting a blog to make a permanent record of my weaving journey.

I’ll probably discover things that are written in a book somewhere, use incorrect terms, and the discoveries made by me are probably evident and already discovered time and time over. Or perhaps there’s better ways to do certain things that will elude me for a while.

However I am mostly learning things on my own. And I think that can be pretty exciting.

My experience in weaving to date has mostly been with a 24″ Kromski Harp rigid heddle loom and and Ashford Inklette. My first attempt at tablet weaving did not fare to well.

However all of that will change soon with my soon-to-occur purchase of an 8-shaft table loom. To prepare, I’ve started thinking about books I’d like to have, and reading a lot about drafting – I don’t mind selecting drafts from various sources, but I do want to design some of my own patterns from time to time.

This is the place where I plan to discuss what I learn about all of this and to document my projects.

For the time being, the latest project to come off of the loom is a rayon chenille scarf done in simple plain weave. I purchased the yarn at Webs when visiting my friend Aaron in Albany for my birthday several weeks ago. This is the first time on my rigid heddle where I thought long and hard about my desired sett and drape, and tried to avoid my usual loose weaves.

A little accident occured (fortunately towards the end of the project) where something snapped and the whole cloth and remaining warp threads rolled to the bottom of the floor. I decided the length was good enough and didn’t bother trying to finish it. But it resulted in quite a bit of waste. I decided to wet finish the scarf, and I think now that its all dried and done, it come out wonderfully and has amazing drape.

Rayon Chenille Scarf
Yarn: Valley Fibres Rayon Chenille, 1450 YPP
sett: 10 epi, 80 warp ends

Amount used: ~ 580 yards

width: 6.5″
length: ~ 56″

Loom: Kromski Harp Rigid Heddle 24″